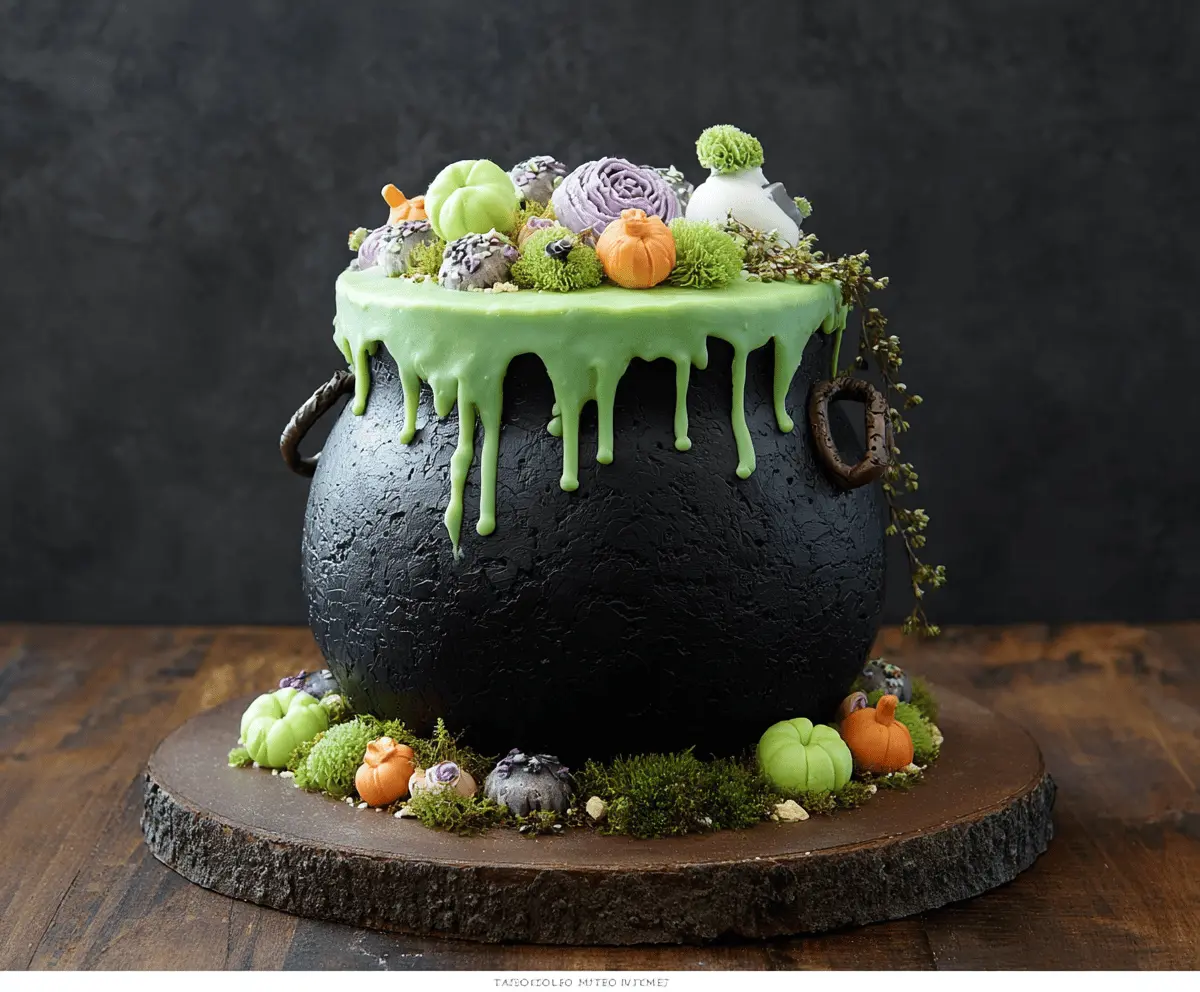
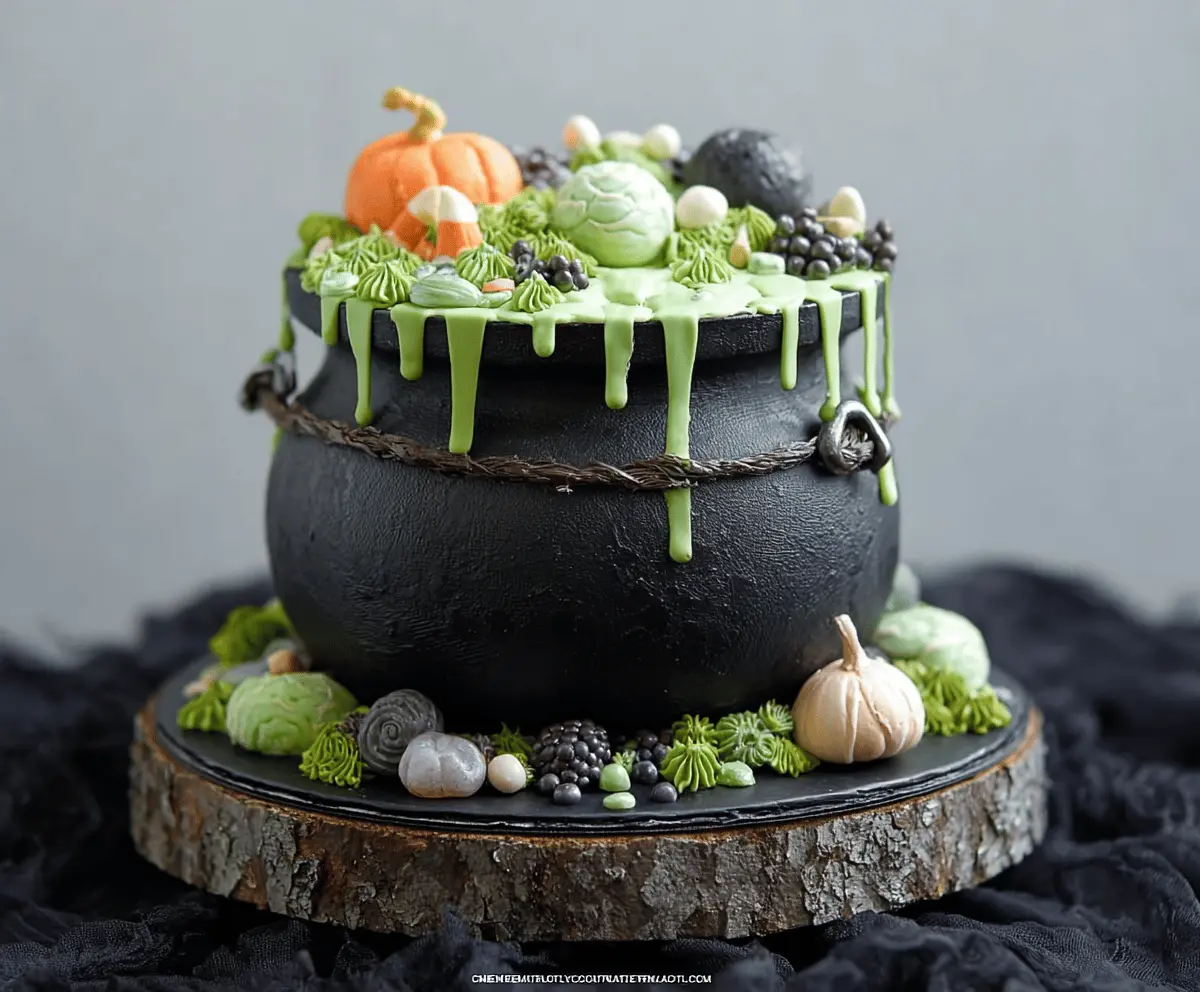
This fun and spooky Witch Cauldron Cake is perfect for Halloween! It’s a rich chocolate cake filled with yummy surprises like gooey caramel and colorful candies. 🎃
Let’s be honest, who wouldn’t want a cake that looks like it’s bubbling over? I like to add gummy worms on top for extra giggles. It’s both creepy and delicious! 😄
Making this cake is a great way to enjoy baking with friends. I enjoy serving it at parties, and it always gets a cheerful response. Get ready for some oooohs and aaaahs!
Key Ingredients & Substitutions
All-Purpose Flour: This is your base for the cake. If you’re gluten-free, use a 1:1 gluten-free baking flour instead. I’ve used it before, and it works just as well!
Cocoa Powder: Unsweetened cocoa gives the cake depth of flavor. If you need a substitute, try using Dutch-processed cocoa for a richer taste.
Black Gel Food Coloring: This is key to achieving that ominous cauldron color. If you don’t have it, you can use a mix of dark chocolate or even activated charcoal (for a more natural option). Just don’t overdo it!
White Chocolate or Candy Melts: Essential for the green drip! You can swap it for dark chocolate if you prefer, but remember, it will change the final color of your drip icing!
Fondant or Marzipan: This is so handy for creating cute decorations like pumpkins. If you’re not a fan, use store-bought edible cake decorations instead!
How Do I Get the Perfect Green Drip Icing?
The green drip icing really makes this cake stand out! Here’s how to get it just right:
- Start by heating your heavy cream until it’s just simmering, not boiling!
- Pour it over your chocolate and let it sit for a minute. Then stir until fully melted — take your time here!
- Add green gel food coloring until you reach a bright shade.
- Let your drip cool slightly before pouring it onto the cake; it needs to be warm but thick enough to hold its shape as it drips.
Practicing the drip technique can be fun! I always have a trial run on a piece of parchment paper before heading for the cake.
Witch Cauldron Cake
Ingredients You’ll Need:
For the Black Cauldron Cake:
- 2 ½ cups all-purpose flour
- 1 ½ cups granulated sugar
- 1 cup unsweetened cocoa powder
- 1 ½ teaspoons baking powder
- 1 ½ teaspoons baking soda
- 1 teaspoon salt
- 3 large eggs
- 1 cup whole milk
- ½ cup vegetable oil
- 2 teaspoons vanilla extract
- 1 cup boiling water
- Black gel food coloring
For the Green Drip Icing:
- 2 cups white chocolate chips or candy melts
- ⅓ cup heavy cream
- Green gel food coloring
For Decorations:
- Fondant or marzipan in colors: green, orange, purple, white (for modeling pumpkins, flowers, and other decorative shapes)
- Edible moss or green-colored cake crumbs (for base decorations)
- Pretzels or fondant for cauldron handles (dark brown colored)
- Optional: edible black sprinkles for added details
How Much Time Will You Need?
This wonderful Witch Cauldron Cake will take about 1 hour of preparation time, plus around 30-35 minutes of baking. After baking, allow for cooling and an additional 1 hour for decorating. Plan for at least 2 hours before your gathering, or even overnight if you prefer to make sure it’s perfect!
Step-by-Step Instructions:
1. Bake the Cake:
Start by preheating your oven to 350°F (175°C) and greasing and flouring two 8-inch round cake pans. In a large bowl, sift together the flour, cocoa powder, baking powder, baking soda, salt, and sugar. Next, add the eggs, milk, oil, and vanilla extract, mixing on medium speed until everything is well blended. Now, carefully stir in boiling water along with a few drops of black gel food coloring until the batter is smooth and a rich black color. Pour the batter evenly into the prepared pans and bake for 30-35 minutes. Just stick a toothpick in the center, and if it comes out clean, your cake is done! Let them cool in the pans for 10 minutes, then move to wire racks to cool completely.
2. Prepare the Base Frosting:
Once your cakes are completely cool, it’s time to stack and fill them with frosting of your choice (chocolate buttercream or cream cheese frosting are excellent!). You can let your creativity flow here! Gently carve the cakes if you want to shape them into more of a cauldron shape. Apply a thin crumb coat of black buttercream over the entire cake to lock in those crumbs. Pop it in the refrigerator for about 30 minutes, then finish with a thicker, smooth layer of black buttercream that has a bit of texture to mimic a cast iron cauldron.
3. Make the Green Drip:
Now it’s time to make your magical green drip! Heat the heavy cream just until it’s simmering, then pour it over the white chocolate chips or candy melts. Stir until everything is melted and smooth. Then, add a dollop of green gel food coloring until you get the bright hue you desire. Allow this mixture to cool slightly; it should be warm enough to drip but not too hot, so it runs away!
4. Decorate:
Pour that luscious green drip carefully over the top edge of your cake, allowing it to cascade down the sides. It should look like bubbling witch’s brew! Shape or paint pretzel handles and attach them firmly to the sides of the cake. Create pumpkins, flowers, and other fun shapes using fondant or marzipan, placing them on top and around the base of the cake. Sprinkle edible moss and add other fun decorations for that enchanting forest floor effect.
5. Finishing Touches:
To add a little extra texture and whimsy, sprinkle some edible black sprinkles on top. Keep the cake in the fridge until you’re ready to serve it, helping the drip stay firm. When you’re ready, let it come to room temperature before cutting into this magical delight!
Enjoy your stunning Witch Cauldron Cake, perfect for impressing your guests at any spooky celebration!
Can I Use Different Flavors for the Cake?
Absolutely! While this recipe features a rich chocolate flavor, you can substitute the cocoa powder with vanilla or almond extract and adjust the sugar accordingly for a different taste. Just keep the rest of the base ingredients the same for the best texture.
How Should I Store Leftover Cake?
Store any leftover cake in an airtight container in the refrigerator for up to 3-4 days. If you’d like to freeze it, wrap individual slices tightly in plastic wrap followed by foil, and store in the freezer for up to 2 months. Just thaw overnight in the fridge before serving!
Can I Make the Drip Icing Ahead of Time?
Yes, you can prepare the green drip icing in advance! Just store it in an airtight container in the fridge. When you’re ready to use it, gently reheat in the microwave (15-30 seconds), stirring until you reach the desired pouring consistency.
What If I Don’t Have Gel Food Coloring?
If you don’t have gel food coloring, you can use liquid food coloring, but be mindful that it may alter the batter’s consistency slightly. Start with a few drops and adjust to reach your desired color. You could also consider cocoa powder for a more natural dark shade without additional liquids!