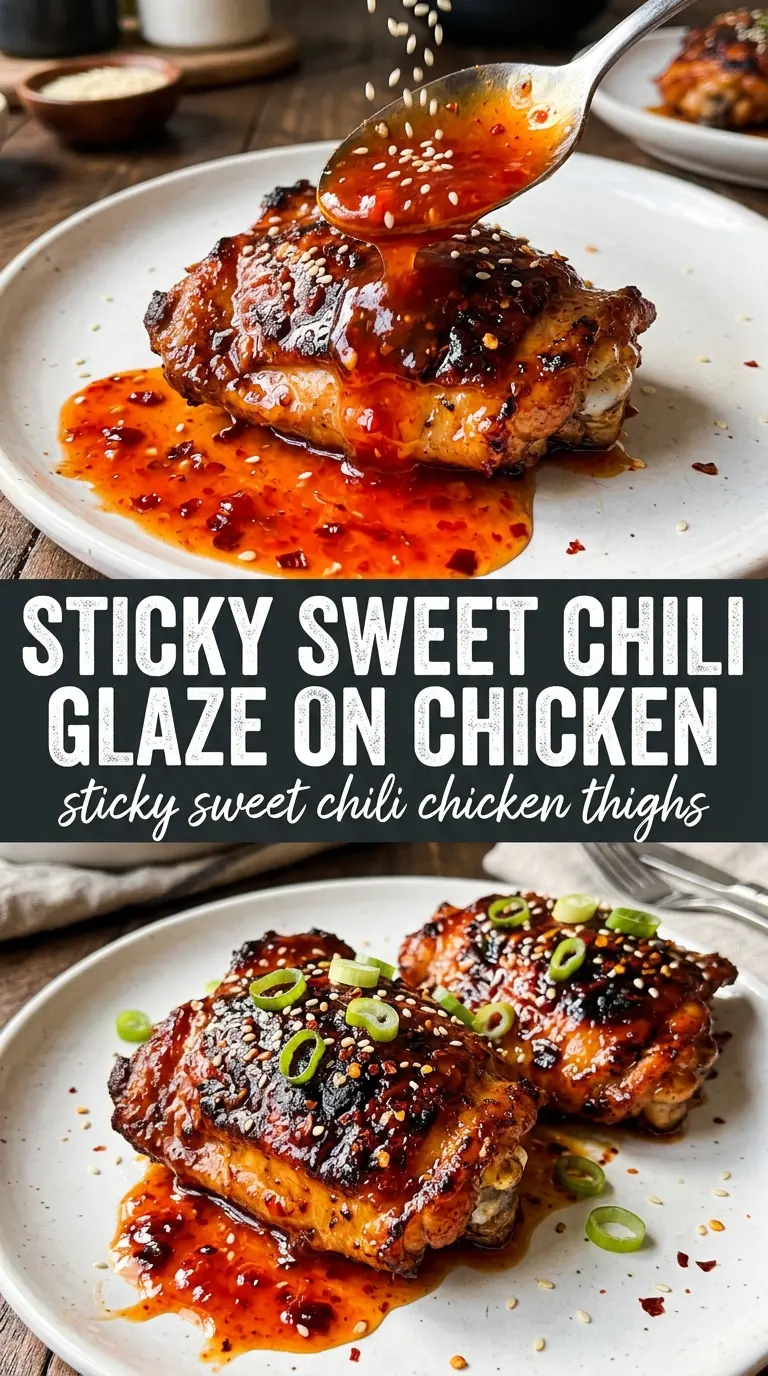
Sticky sweet chili chicken thighs come out of the oven with bronzed skin, a lacquered glaze, and edges that cling to the pan in all the best ways. The sauce turns glossy and clingy instead of watery, and the chicken stays juicy under that sweet-tangy coating. It’s the kind of dinner that looks like you fussed over it, even though the oven does most of the work.
What makes this version work is the balance in the glaze. Sweet chili sauce brings body and sweetness, soy sauce adds salt and depth, rice vinegar and lime juice keep it from tasting flat, and a little honey helps the glaze caramelize instead of just drying out. Bone-in, skin-on thighs matter here because the skin protects the meat while the fat renders and helps the sauce stick.
Below, I’ve included the small timing details that keep the glaze sticky instead of burnt, plus a couple of smart swaps if you need them. If you’ve ever had oven-glazed chicken turn pale or watery, the process section will help with that.
The glaze got sticky and caramelized instead of sliding off, and the chicken stayed juicy even after broiling. I served it with rice and the sauce soaked in perfectly.
Like these sticky sweet chili chicken thighs? Save them to Pinterest for the nights when you want glossy, caramelized chicken with almost no cleanup.
The Glaze Needs Time in the Oven, Not More Liquid
The biggest mistake with glazed chicken is treating the sauce like a marinade that should stay loose and plentiful all the way through baking. It shouldn’t. This sauce starts thin enough to coat the chicken, then thickens as the moisture cooks off and the sugars concentrate. If you add too much liquid or cover the dish, you’ll steam the chicken skin instead of caramelizing it.
The other thing that matters is the broiler finish. That last few minutes gives you the sticky spots and dark edges that make this dish taste finished. Watch it closely, because sweet chili sauce can go from glossy to scorched fast once the sugar starts bubbling hard.
- Bone-in, skin-on chicken thighs — These hold up to the full bake without drying out, and the skin gives the glaze a surface to cling to. Boneless thighs work in a pinch, but they won’t give you the same deep caramelization or protected, juicy center.
- Sweet chili sauce — This is the backbone of the glaze, so use one you actually like on its own. Thicker sauces usually caramelize better than thin, watery versions.
- Soy sauce — This adds salt and savory depth, which keeps the glaze from tasting like candy. Low-sodium soy sauce works fine here if that’s what you keep on hand.
- Rice vinegar and lime juice — Both keep the sweetness bright and stop the glaze from tasting one-note. If you only have one, use the rice vinegar for balance and finish with a little extra lime right before serving.
- Honey — It helps the glaze cling and darken in the oven. If your sweet chili sauce is already very thick and sweet, you can reduce the honey slightly, but don’t skip the sweetener entirely or the glaze won’t lacquer the same way.
What Each Ingredient Is Actually Doing in This Recipe
- Primary ingredient (the star) — Quality matters most. Choose the best you can find.
- Cooking medium (oil, butter, or broth) — This carries flavors and prevents dryness.
- Seasonings (salt, pepper, spices, herbs) — Layer flavors so nothing overpowers. Build depth gradually.
- Aromatics (garlic, onion, herbs) — Cook with fat to bloom flavors. Become the foundation.
- Supporting ingredients — Complement the main ingredient without overpowering it.
- Sauce or liquid (if applicable) — Brings flavors together. Balance richness with acid.
- Acid (lemon, vinegar, wine, or other) — Brightens and prevents flat-tasting results.
- Final finish (garnish, glaze, or sauce) — Prevents one-dimensional taste and adds visual appeal.
Getting the Chicken Sticky Without Burning the Sauce
Whisking the Glaze
Whisk the sweet chili sauce, soy sauce, rice vinegar, lime juice, garlic, ginger, honey, and red pepper flakes until the mixture looks smooth and a little glossy. You want the honey fully dissolved so it doesn’t sit in streaks at the bottom of the dish. If the garlic is very chunky, it can burn on the surface during broiling, so mince it finely. The sauce should taste a little stronger than you think it needs to; the chicken will mellow it out.
Marinating for Flavor, Not Tenderizing Forever
Coat the chicken and let it sit for 30 minutes while the oven heats. That short rest is enough for the seasoning to cling and the garlic, ginger, and acid to start working into the surface. Don’t leave it in the marinade for hours, because the vinegar and lime can start making the texture a little soft. You’re aiming for seasoned chicken, not pickled chicken.
Baking Until the Skin Starts to Tighten
Place the thighs skin-side up in the baking dish and pour the sauce over them, then bake at 425°F for about 20 minutes. By then, the skin should look taut and the sauce should be bubbling around the edges. Baste with the sauce in the pan, but don’t drown the tops of the thighs; you want the skin exposed so it can keep crisping. If the pan looks dry early, spoon the glaze from the bottom over the chicken, not plain liquid from the corners.
Finishing Under the Broiler
After the second bake, broil for about 3 minutes to push the glaze into that sticky, caramelized finish. Stay close and watch for deepening color on the highest points of the chicken skin. If your broiler runs hot, even a minute can be enough to tip the glaze from lacquered to burnt. Pull the dish when the sauce looks thick, bubbling, and darkened at the edges.
Make It Gluten-Free with One Swap
Use tamari or a certified gluten-free soy sauce in place of regular soy sauce. The flavor stays in the same lane, and the glaze still reduces the same way, so you won’t lose that sticky finish.
Use Boneless Thighs for Faster Weeknights
Boneless thighs will cook faster, usually in closer to 20 minutes total, but they won’t get the same rich skin-on texture. They still work well if you want easier serving, just watch the glaze more closely because the thinner meat can overcook fast.
Turn It Into Sweet Chili Chicken Wings
The same glaze works on wings, but the cook time changes and the chicken needs to be arranged in a single layer so the skin can crisp. Wings give you more edges and more caramelized spots, but they also need a watchful broil so the sauce doesn’t burn before the skin is done.
Storage and Reheating
- Refrigerator: Store leftovers for up to 4 days. The skin softens, but the glaze stays flavorful.
- Freezer: Freeze cooked chicken thighs for up to 2 months. Wrap them tightly and freeze with a little extra sauce if you can; that helps protect the glaze.
- Reheating: Reheat in a 350°F oven, covered loosely with foil for the first part, then uncover at the end so the glaze can re-stick. The common mistake is blasting them in the microwave, which makes the skin rubbery and the sauce split.
Answers to the Questions Worth Asking

Sticky Sweet Chili Chicken Thighs
Ingredients
Equipment
Method
- Whisk sweet chili sauce, soy sauce, rice vinegar, lime juice, garlic, ginger, honey, and red pepper flakes until evenly combined and glossy.
- Marinate the chicken for 30 minutes while the oven preheats to 425°F.
- Place chicken skin-side up in a baking dish and pour the sauce over.
- Bake for 20 minutes, then baste the chicken with the sauce so the skin starts to lacquer.
- Bake for 10 more minutes until deeply caramelized and sticky, with a thick, glossy glaze coating the chicken.
- Broil for 3 minutes to boost stickiness and caramelization, watching closely so the glaze doesn’t burn.
- Garnish with sesame seeds, sliced green onions, and lime wedges before serving.


